That being said, however, in the past couple of weeks I've visited several quilt shops seeking inspiration. I finished up my son and daughter-in-law's wedding quilt (four years late); starting binding a lap quilt I made back in Virginia; ordered some materials for a group project that is due on the 15th (and clearly will be late); finished the top of my latest quilt for Grandson Charlie; and ordered some backing fabric for it. I also stitched up a little strawberry shaped bag. The bag was a Fig Tree Threads Pattern:
I've never been one to use patterns that much (they call for more discipline than I have, generally) but whenever I break down and use one, I'm usually happy with the results. Go figure - some of us are bound and determined to make life hard on ourselves, I guess. Some of us go further and make life hard on others while we're at it.
I decided to use a red fabric for the berry and quilted it using a spray on adhesive to help hold it, together. I really hate pinning things to quilt and prefer the spray when I can get away with it.
I quilted in a simple grid with white muslin for the backing. Using the template from the pattern on freezer paper, I cut out the front and back of the berry body. So far, so good:
After stitching the body, right sides together and leaving open the top, I cut pie shaped points on the edges of the quilted "berry."
The lining was from the same template, only stitched deeper so it would fit inside (that's it underneath the "berry"). I also left open an additional four inch gap to turn it, later:
After that, I used templates to make leaves. I stitched them, right sides together, leaving open the top to turn:
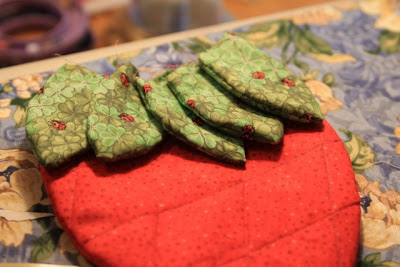
Per directions, I turned them and overlapped them on the top of the berry:I've had this green fabric with the lady bugs for a long time and was glad to use it for this.
I doubled up on the amount of fabric the pattern called for so the strap would be thicker:
Here is a closeup of the leaves pinned to the body:
I discovered that pinning the leaves horizontally didn't work so well because when I tried to stitch it to the lining, the pins kept catching. I ended up having to frog stitch and redo it. The second time, I put the pins in vertically so they wouldn't catch. I also basted the top to keep the leaves flat. Here is a photo that also includes the strap (in this photo, the pins are still horizontal - I guess this was taken at the first try):The strap is shorter than the pattern called for, just because. I took the length in the pattern simply as a "suggestion." I do that, alot.
The next step was to slide the "berry" (right sides out) into the lining. The right sides of the "berry" and the lining were facing:
You then just stitch around the top edge to catch the leaves and the straps. Here is a closeup:
It is a little tricky because the layers of the straps, seams and leaves are on the underside where you can't see them but not really hard if you're careful. And if you mess up, it's easy enough to frog stitch and redo. Once you stitch around the top, you turn it inside out through the gap left in the lining. You then stitch the gap closed. This is a photo showing turning it inside out, in progress:
Where I messed up was that I should have used a lining that didn't clash with the leaves. I'd never made a purse with a lining so didn't realize that the inside would poke up, a little, over the seam. Didn't even occur to me. Were I to do it, again, I'd have used matching green fabric so it wouldn't be obvious.
I gifted Evelyn with the purse but she wasn't at all pleased about the "honor:"
Pearl took it a little better:
Here are a few photos of the bag:
See? Green or red would have been a much better color for the lining:
Live and learn.


5 comments:
Cute bag! And adorable models. I'm going to be a little late in the project due the 15th as well. I think everyone in the group is in a bit of a funk.
A tip for your bag - turn lining a bit more to the inside and topstitch around it. This will keep the lining from peeking out and keep the layers together better. I use this method a lot in making clothes and home dec items.
The ladybug and shamrock fabric is just right for that bag. The whole bag looks lovely! Maybe you could hand baste the lining down under the leaves and pull it down some so the top liner doesn't show as much.
Are you going to the OKC Central Guild show June 24 or 25 at the state fairgrounds? Mother and I will go Friday.
Cute necklace. ;0)
You're not alone, I have been in a quilting funk too.
Very cute bag!
I love the lady birds on the green fabric.
I was going to suggest what Dee said about the lining....but she explained it much better than I could, anyway!
Any photos of Charlie's new quilt???
Hi!!! I've made three quilt blocks in the past 3 1/2 months. Does that qualify as a funk?????
Post a Comment